# Database-synchronization
**Repository Path**: zyw19871007/Database-synchronization
## Basic Information
- **Project Name**: Database-synchronization
- **Description**: MySQL数据库同步脚本
- **Primary Language**: Unknown
- **License**: Not specified
- **Default Branch**: master
- **Homepage**: None
- **GVP Project**: No
## Statistics
- **Stars**: 0
- **Forks**: 0
- **Created**: 2021-11-30
- **Last Updated**: 2021-11-30
## Categories & Tags
**Categories**: Uncategorized
**Tags**: None
## README
# 数据库增量同步

[博客地址](https://www.cnblogs.com/chancey/p/12327056.html)
## 一、简单介绍
本项目全程python,目前可以同步两台mysql之间的数据库,需要指定表,该脚本会长期维护,欢迎提交评论以及修改建议。
[](https://imgchr.com/i/rluBxP)2.0版本将添加全库不指定表同步;
[](https://imgchr.com/i/rluBxP)3.0版本将添加多个附属数据库同时增量同步;
## 二、支持环境
| 键 | 值 |
| :--: | :--: |
| 操作系统 | CentOS 7.2以上 |
| python版本 | 3.6.5以上 |
| mongo版本 | 4.4.2 |
## 三、部署环境
1. 安装Python解释器以及virtualenvwrapper
[安装python解释器和配置虚拟环境](https://www.cnblogs.com/chancey/p/9848867.html)
2. 安装mongoDB以及配置
[安装mongoDB服务器](https://www.cnblogs.com/chancey/p/9848893.html)
3. 安装python的依赖包
`pip install -r requirements.txt -i https://pypi.douban.com/simple`
至此,所有的环境安装完毕,可以初始化项目
## 四、 初始化项目
1. 首先配置项目跟目录下的`config.yaml`文件,详细配置信息如下:
```
# 脚本信息 (无需修改,项目信息而已)
__apiVersion: v1.0
__author: chancey
__kind: Deployment
# mongoDB的配置信息 (mongo的地址,建议配置上用户名以及密码,防止被黑,反正我是中招了)
mongoDB:
host:
port:
user:
password:
# 间隔时间 (同步间隔时间,单位为秒,建议不要太频繁,毕竟服务器资源有限)
sleep: 20
```
2. 打开`init/init.py`文件,尽量使用`vim`打开,避免出现不必要的编码问题,只需要配置`程序配置`的部分
- `serverConfig`为列表,请注意中英文的切换,注意格式,其中有两台服务器的设置
```
serverConfig = [
# 主服务器
{"host": "", "port": 3306, "user": "", "password": "", "database": "", "charset": "utf8mb4"},
# 从服务器
{"host": "", "port": 3306, "user": "", "password": "", "database": "", "charset": "utf8mb4"}
]
```
- `tableNames`为列表,请注意中英文的切换,注意格式,需要同步哪些表就填哪些,暂时不支持自动识别表
```
# 需要同步的表
tableNames = [
'user_number',
'user_info',
'user_umps',
'tech_data'
]
```
3. 运行初始化脚本`init/init.py`
```
workon py3env # 进入虚拟环境
python init/init.py # 运行项目的初始化脚本
```
[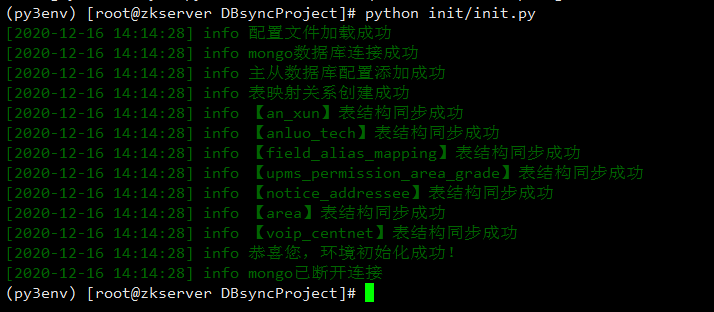](https://imgchr.com/i/rlYxtf)
> 注意:如果这里出现找不到`config.yaml`文件,请`cd`项目根目录下再次运行,如果还有问题,请携图Issues我[](https://imgchr.com/i/rl1vD0)
## 五、运行项目
```
- CD到项目根目录下
/root/.virtualenvs/py3env/bin/python3 -u DBsync.py >> sprint.out 2>&1 &
- 通过PS查看是否正常运行
ps -aux | grep DBsync.py
- 即时日志
tail -f sprint.out
- 终止
ps -aux | grep DBsync.py
kill -9 上边查出来的pid号
```
# 六、觉得好用请给个star
[博客地址](https://www.cnblogs.com/chancey/p/12327056.html)