# Android Jetpack
**Repository Path**: beyond-prototype/jetpack
## Basic Information
- **Project Name**: Android Jetpack
- **Description**: Android Jetpack入门
- **Primary Language**: Android
- **License**: GPL-2.0
- **Default Branch**: master
- **Homepage**: https://gitee.com/beyond-prototype/jetpack
- **GVP Project**: No
## Statistics
- **Stars**: 1
- **Forks**: 0
- **Created**: 2021-10-29
- **Last Updated**: 2022-03-30
## Categories & Tags
**Categories**: Uncategorized
**Tags**: None
## README
## Android Jetpack入门
### 1. Jetpack简介
Android官网的[Jetpack](https://developer.android.google.cn/jetpack)简介:
**Jetpack是一个由多个库组成的套件,可帮助开发者遵循最佳做法、减少样板代码并编写可在各种 Android 版本和设备中一致运行的代码,让开发者可将精力集中于真正重要的编码工作。**
1)遵循最佳做法: Jetpack组件采用最新的设计方法构建,具有向后兼容性,可以减少崩溃和内存泄露。
2)减少样板代码: Jetpack可以管理各种繁琐的活动(如后台任务、导航和生命周期管理),让开发者专注于业务逻辑。
3)减少不一致性: Jetpack组件可在各种 Android 版本和设备中以一致的方式运作,降低App开发的复杂性。
有关Jetpack的详细介绍,可以参考以下文章:
1)[Jetpack 是什么?](https://zhuanlan.zhihu.com/p/334350927)
2)[AndroidX 的前世今生](https://zhuanlan.zhihu.com/p/336984453)
### 2. Demo App
这里以微信作为原型,使用Jetpack的组件来构建一个Demo App。


 ### 3. Demo App 技术架构
 #### 3.1 View Layer 界面层
界面层使用Jetpack Compose来构建界面元素,使用Jetpack Navigation来实现导航功能。
界面层的每个屏幕对应一个Screen级别的Composable函数,它接收来自业务层的数据并将数据传播给其他细粒度的Composable函数,通过组合其他更小粒度的Composable函数来构建一个完整的屏幕界面。
Composable函数接收可观察的数据(State),并将数据的变化更新到相应的界面组件。
#### 3.1 View Layer 界面层
界面层使用Jetpack Compose来构建界面元素,使用Jetpack Navigation来实现导航功能。
界面层的每个屏幕对应一个Screen级别的Composable函数,它接收来自业务层的数据并将数据传播给其他细粒度的Composable函数,通过组合其他更小粒度的Composable函数来构建一个完整的屏幕界面。
Composable函数接收可观察的数据(State),并将数据的变化更新到相应的界面组件。
 Composable函数(例如Button的clickable属性)通过监听用户交互事件(Event)触发ViewModel的Command来执行业务逻辑。
 Constraints用于制定界面元素的尺寸例如宽高,仅供Composable函数内部使用。
#### 3.2 Business Layer 业务层
使用ViewModel来管理业务逻辑和控制数据访问,ViewModel的主要职责是:
1)给界面层的Composable函数提供数据
调用Repository获取被界面观察的数据,并通过State Holder将数据提供给View界面层
例如
```kotlin
val uiState = TopicDetailState()
init {
launch {
uiState.topic = topicRepository.getOne(topicId)
uiState.messages = messageRepository.get(topicId)
}
}
```
2)响应界面层的用户事件并执行封装在Command组件的业务逻辑,最终通过更新State或者更新Model(通过Flow将变化自动转换成State)来反馈用户的操作结果。
例如在当发送用户消息时,我们把消息存到本地数据库,并清空界面的输入框的消息。
```kotlin
val uiCommands = object : TopicDetailCommands {
override fun sendMessage() {
//logic omitted
}
}
```
#### 3.3 Data Access Layer 数据访问层
数据访问层主要有三大组件:
1)Repository: 提供统一的数据访问接口给业务层,其内部则使用Dao和WebService来获取或修改数据。
2)Dao(Data Access Object):访问本地数据源例如Room数据库的接口,并使用Flow将数据传送给界面层,由界面层转换成可观察的State。
```kotlin
@Dao
interface MessageDao : BasicDao {
@Query("select * from message where topic_id = :topicId order by id asc")
fun get(topicId:Long): Flow>
}
```
3)WebService:访问后台数据的接口。如果本地数据源没有数据,或者数据跟后台不同步,Repository则需要通过WebService从后台获取最新数据并同步到Room数据库。
```kotlin
interface MessageService {
/**
* get all messages for the specific topic
*/
@GET("message/{topicId}/list")
fun getMessages(@Path("topicId") topicId: Long): Call>>
}
```
### 4. Jetpack Compose
[Jetpack Compose](https://developer.android.google.cn/jetpack/compose) 是用于构建原生 Android 界面的新工具包。
[为什么采用 Compose](https://developer.android.google.cn/jetpack/compose/why-adopt#intuitive)
1) 更少的代码: 使用更少的代码实现更多的功能,并且可以避免各种 bug,从而使代码简洁且易于维护。
2) 直观: Compose提供声明性的API,我们只需描述界面,Compose 会负责处理剩余的工作。应用状态变化时,界面会自动更新。
(除了Compose,Flutter和SwiftUi也支持声明式的界面开发方法,这三者有很多相似之处)
3) 加快应用开发: 兼容现有的所有代码,支持View和Compose的相互调用。借助实时预览和全面的 Android Studio 支持,实现快速迭代。
4) 功能强大: 直接访问 Android 平台 API,内置对 Material Design、深色主题、动画等的支持。
有关Jetpack Compose的介绍,可以参考以下文章:
1) [Jetpack Compose 教程](https://developer.android.google.cn/jetpack/compose/tutorial)
2) [Compose 编程思想](https://developer.android.google.cn/jetpack/compose/mental-model)
3) [深入详解 Jetpack Compose | 优化 UI 构建](https://zhuanlan.zhihu.com/p/267250784)
4) [Jetpack Compose Android UI 开发的最终形态?](https://zhuanlan.zhihu.com/p/356131023)
#### 4.1 Composable 可组合函数(组合模式,组合优于继承)
Composable函数应该尽可能设计为Stateless无状态的,以便于重用和测试。
状态提升(State hoisting)是一种实现无状态Composable的方案,Composable不再管理它使用的State,而是让Composable的使用者(例如ViewModel)来管理State。
Constraints用于制定界面元素的尺寸例如宽高,仅供Composable函数内部使用。
#### 3.2 Business Layer 业务层
使用ViewModel来管理业务逻辑和控制数据访问,ViewModel的主要职责是:
1)给界面层的Composable函数提供数据
调用Repository获取被界面观察的数据,并通过State Holder将数据提供给View界面层
例如
```kotlin
val uiState = TopicDetailState()
init {
launch {
uiState.topic = topicRepository.getOne(topicId)
uiState.messages = messageRepository.get(topicId)
}
}
```
2)响应界面层的用户事件并执行封装在Command组件的业务逻辑,最终通过更新State或者更新Model(通过Flow将变化自动转换成State)来反馈用户的操作结果。
例如在当发送用户消息时,我们把消息存到本地数据库,并清空界面的输入框的消息。
```kotlin
val uiCommands = object : TopicDetailCommands {
override fun sendMessage() {
//logic omitted
}
}
```
#### 3.3 Data Access Layer 数据访问层
数据访问层主要有三大组件:
1)Repository: 提供统一的数据访问接口给业务层,其内部则使用Dao和WebService来获取或修改数据。
2)Dao(Data Access Object):访问本地数据源例如Room数据库的接口,并使用Flow将数据传送给界面层,由界面层转换成可观察的State。
```kotlin
@Dao
interface MessageDao : BasicDao {
@Query("select * from message where topic_id = :topicId order by id asc")
fun get(topicId:Long): Flow>
}
```
3)WebService:访问后台数据的接口。如果本地数据源没有数据,或者数据跟后台不同步,Repository则需要通过WebService从后台获取最新数据并同步到Room数据库。
```kotlin
interface MessageService {
/**
* get all messages for the specific topic
*/
@GET("message/{topicId}/list")
fun getMessages(@Path("topicId") topicId: Long): Call>>
}
```
### 4. Jetpack Compose
[Jetpack Compose](https://developer.android.google.cn/jetpack/compose) 是用于构建原生 Android 界面的新工具包。
[为什么采用 Compose](https://developer.android.google.cn/jetpack/compose/why-adopt#intuitive)
1) 更少的代码: 使用更少的代码实现更多的功能,并且可以避免各种 bug,从而使代码简洁且易于维护。
2) 直观: Compose提供声明性的API,我们只需描述界面,Compose 会负责处理剩余的工作。应用状态变化时,界面会自动更新。
(除了Compose,Flutter和SwiftUi也支持声明式的界面开发方法,这三者有很多相似之处)
3) 加快应用开发: 兼容现有的所有代码,支持View和Compose的相互调用。借助实时预览和全面的 Android Studio 支持,实现快速迭代。
4) 功能强大: 直接访问 Android 平台 API,内置对 Material Design、深色主题、动画等的支持。
有关Jetpack Compose的介绍,可以参考以下文章:
1) [Jetpack Compose 教程](https://developer.android.google.cn/jetpack/compose/tutorial)
2) [Compose 编程思想](https://developer.android.google.cn/jetpack/compose/mental-model)
3) [深入详解 Jetpack Compose | 优化 UI 构建](https://zhuanlan.zhihu.com/p/267250784)
4) [Jetpack Compose Android UI 开发的最终形态?](https://zhuanlan.zhihu.com/p/356131023)
#### 4.1 Composable 可组合函数(组合模式,组合优于继承)
Composable函数应该尽可能设计为Stateless无状态的,以便于重用和测试。
状态提升(State hoisting)是一种实现无状态Composable的方案,Composable不再管理它使用的State,而是让Composable的使用者(例如ViewModel)来管理State。
 每个Screen级别的Composable函数接收以下三种参数:
1) State Holder: Composable函数观察的数据容器,Composable函数通过collectAsState()把容器内的数据转换成可观察的State,并State传递给它调用的其他Composable函数。
例如聊天模块使用的TopicDetailState,它由顶部的"主题"(topic)和聊天窗口的"消息"(messages)等组成,这些数据由ViewModel从数据层获得。
```kotlin
class TopicDetailState {
var topic: Flow = emptyFlow()
var messages:Flow> = emptyFlow()
}
```
TopicDetailScreen()函数将topic和messages转换层可观察的State
```kotlin
val topic by viewModel.uiState.topic.collectAsState(initial = Topic())
val messages by viewModel.uiState.messages.collectAsState(initial = emptyList())
```
2) Command:处理界面事件(Event)的业务逻辑接口,具体业务逻辑则由业务层实现。
例如当用户点击"Send"按钮发送消息时,onClick事件将调用发送消息的接口sendMessage()
```kotlin
Button(onClick = { commands.sendMessage() }){
Text("Send",modifier = Modifier.padding(0.dp), style = DemoTheme.typography.button)
}
```
Command接口
```kotlin
interface TopicDetailCommands {
fun sendMessage()
}
```
3) Constraints:用于管理界面元素的尺寸,只在界面内部使用。
当需要修改界面元素的尺寸时,只需修改Constraints类,而不用逐个界面逐个元素去修改。
如果屏幕的尺寸发生变化,例如横竖屏切换的时候,Constraints会自动从新计算界面元素尺寸。
```kotlin
companion object{
val instance = LayoutConstraints()
fun init(configuration: Configuration): LayoutConstraints{
synchronized(instance) {
if (configuration.screenWidthDp != instance.screenWithDp) {
instance.init(configuration)
}
}
return instance
}
}
```
#### 4.2 Compose Navigation 导航
Demo App的导航概览如下图
每个Screen级别的Composable函数接收以下三种参数:
1) State Holder: Composable函数观察的数据容器,Composable函数通过collectAsState()把容器内的数据转换成可观察的State,并State传递给它调用的其他Composable函数。
例如聊天模块使用的TopicDetailState,它由顶部的"主题"(topic)和聊天窗口的"消息"(messages)等组成,这些数据由ViewModel从数据层获得。
```kotlin
class TopicDetailState {
var topic: Flow = emptyFlow()
var messages:Flow> = emptyFlow()
}
```
TopicDetailScreen()函数将topic和messages转换层可观察的State
```kotlin
val topic by viewModel.uiState.topic.collectAsState(initial = Topic())
val messages by viewModel.uiState.messages.collectAsState(initial = emptyList())
```
2) Command:处理界面事件(Event)的业务逻辑接口,具体业务逻辑则由业务层实现。
例如当用户点击"Send"按钮发送消息时,onClick事件将调用发送消息的接口sendMessage()
```kotlin
Button(onClick = { commands.sendMessage() }){
Text("Send",modifier = Modifier.padding(0.dp), style = DemoTheme.typography.button)
}
```
Command接口
```kotlin
interface TopicDetailCommands {
fun sendMessage()
}
```
3) Constraints:用于管理界面元素的尺寸,只在界面内部使用。
当需要修改界面元素的尺寸时,只需修改Constraints类,而不用逐个界面逐个元素去修改。
如果屏幕的尺寸发生变化,例如横竖屏切换的时候,Constraints会自动从新计算界面元素尺寸。
```kotlin
companion object{
val instance = LayoutConstraints()
fun init(configuration: Configuration): LayoutConstraints{
synchronized(instance) {
if (configuration.screenWidthDp != instance.screenWithDp) {
instance.init(configuration)
}
}
return instance
}
}
```
#### 4.2 Compose Navigation 导航
Demo App的导航概览如下图
 Demo App由三大模块组成,分别是Chat,Contact和Discover。
为了避免模块之间的耦合,每个模块只负责管理自身内部的导航功能,每个模块创建自身的导航图(NavGraph),然后由DemoApp的MainActivity来负责集成各个模块的导航图。
[MainActivity](app/src/main/java/com/example/demo/MainActivity.kt)的示例代码如下
```kotlin
val navController = rememberNavController()
val startDestination = remember { featureSDKs[0].featureKey() }
NavHost(navController = navController, startDestination = startDestination) {
featureSDKs.forEach { featureSdk ->
featureSdk.buildNavigationGraph(this, navController)
}
sharedNestedNavigationGraph(navController, featureSDKs)
}
```
这里使用了Compose提供的NavHost和NavHostController来管理整个App的导航图,并把第一个Feature SDK(例如Chat)作为导航图的路由起点。
为了避免Demo App和各个模块的耦合,每个模块都是通过Feature SDK的方式集成到Demo App,每个Feature SDK都实现buildNavigationGraph(...)接口来提供该模块的导航图。
[ChatFeatureSDK](chat-feature-sdk/src/main/java/com/example/chat/ChatFeatureSDK.kt)的示例代码如下:
```kotlin
override fun buildNavigationGraph(navGraphBuilder: NavGraphBuilder, navHostController: NavHostController) {
navGraphBuilder.chatNestedNavigationGraph(navHostController, featureKey())
}
```
每个Feature SDK用它全局唯一的Feature Key通过navigation(...)函数定义该模块导航图的路由入口,并指定该模块的起始页面(例如Screen.TopicList.route),每个可导航的页面则使用composable(...)函数来定义。
[NavigationGraph](chat-feature-sdk/src/main/java/com/example/chat/navigation/NavigationGraph.kt)的示例代码如下,这里通过给Compose的NavGraphBuilder提供了扩展函数chatNestedNavigationGraph(...)来定义模块的导航图。
```kotlin
fun NavGraphBuilder.chatNestedNavigationGraph(navHostController: NavHostController, featureKey: String) {
NavigationController.instance.navController = navHostController
navigation(startDestination = Screen.TopicList.route, route = featureKey) {
composable(Screen.TopicList.route) {
val viewModel: TopicListViewModel = hiltViewModel()
val uiConstraints = LayoutConstraints.init(LocalConfiguration.current)
TopicListScreen(viewModel.uiState, uiConstraints)
}
composable(Screen.TopicDetail.route,
arguments = listOf(navArgument("id"){ type = NavType.LongType})){
val viewModel: TopicDetailViewModel = hiltViewModel()
val uiConstraints = LayoutConstraints.init(LocalConfiguration.current)
TopicDetailScreen(viewModel.uiState, uiConstraints, viewModel.uiCommands)
}
composable(Screen.TopicSetting.route,
arguments = listOf(navArgument("id"){ type = NavType.LongType})){
val uiConstraints = LayoutConstraints.init(LocalConfiguration.current)
TopicSettingScreen(uiConstraints)
}
}
}
```
为了便于管理路由,这里定义了Screen类管理每个页面的路径。路径可以包含参数,由composable(...)函数的arguments参数指定。
[Screen](chat-feature-sdk/src/main/java/com/example/chat/navigation/Screen.kt)的示例代码如下
```kotlin
enum class Screen(val route: String) {
TopicList("chat/topic/list"),
TopicDetail("chat/topic/{id}/detail"),
TopicSetting("chat/topic/{id}/setting")
}
```
当用户在主题列表TopicListView(左图)里点击某个主题TopicEntryView后就会被导航到对应的主题聊天详情页面(右图)
[TopicListScreen](chat-feature-sdk/src/main/java/com/example/chat/view/TopicListScreen.kt)的示例代码如下
```kotlin
@Composable
fun TopicListView(topics: List, uiConstraints: LayoutConstraints, modifier:Modifier = Modifier.fillMaxSize()){
LazyColumn(modifier = modifier.background(DemoTheme.colors.secondary),
contentPadding = PaddingValues(horizontal = 0.dp,vertical = 8.dp),
verticalArrangement = Arrangement.spacedBy(8.dp)){
items(items = topics, key = {topic -> topic.id!!}){ topic ->
TopicEntryView(topic, uiConstraints){
NavigationController.instance.navigate(Screen.TopicDetail, topic.id.toString())
}
}
}
}
```
每个模块内部的导航这里使用了[NavigationController](chat-feature-sdk/src/main/java/com/example/chat/navigation/NavigationController.kt),
其内部使用了Compose提供的NavHostController来做模块内部的页面导航,navController?.navigate(...),代码如下:
```kotlin
fun navigate(screen: Screen, vararg params: String, builder: NavOptionsBuilder.() -> Unit = {launchSingleTop = true}) {
when(screen){
Screen.TopicDetail ->
navController?.navigate(screen.route.replace("{id}",params[0])){
builder()
}
Screen.TopicSetting ->
navController?.navigate(screen.route.replace("{id}",params[0]))
else ->
navController?.navigate(screen.route){
builder()
}
}
}
override fun navigate(route: String, vararg params: String, builder: NavOptionsBuilder.() -> Unit) {
Screen.values().lastOrNull { it.route == route }?.let {
navigate(it, *params){ builder() }
}
}
```
为了避免模块之间的耦合,模块于模块之间的导航借助NavigationMediator。
例如在Chat模块到聊天详情页面(左图)点击头像可以导航到Contact模块到Contact详情页面(右图),或者在Contact详情页面(右图)点击Message按钮进入到聊天详情页面(左图)。
使用NavigationMediator提供的navigate方法导航到另一个模块,尽可能地减少来模块之间的耦合,特别是模块间的循环依赖问题。
具体做法是当Feature SDK注册到NavigationMediator的时候,同时将它的所有导航路径和它的NavigationController都一并注册到NavigationMediator。
模块间的导航通过NavigationMediator查询目标路径是否存在,如果存在则调用对应的NavigationController导航到目标页面。
[NavigationMediator](app/src/main/java/com/example/demo/NavigationMediator.kt)的示例代码如下:
```kotlin
private val _routes = mutableMapOf()
override fun register(featureSDK: AbstractFeatureSDK) {
Log.i(TAG, "***register feature: key=${featureSDK.featureKey()}, class=${featureSDK.javaClass.canonicalName}")
_features.add(featureSDK)
val navigationController = featureSDK.getNavigationController()
navigationController.getNavigationRoutes().forEach {
_routes[it] = navigationController
Log.i(TAG,"***register route: $it")
}
}
override fun navigate(route: String, vararg params: String, builder: NavOptionsBuilder.() -> Unit) {
Log.i(TAG, "route=$route, hasRoute=${hasRoute(route)}")
if(hasRoute(route)){
_routes[route]?.navigate(route, *params){
builder()
}
}
}
```
#### 4.3 Compose Material Design
使用[Material Design](https://developer.android.google.cn/jetpack/compose/tutorial#lesson-3:-material-design) 管理界面风格,支持深色主题(夜间模式)。
Demo App由三大模块组成,分别是Chat,Contact和Discover。
为了避免模块之间的耦合,每个模块只负责管理自身内部的导航功能,每个模块创建自身的导航图(NavGraph),然后由DemoApp的MainActivity来负责集成各个模块的导航图。
[MainActivity](app/src/main/java/com/example/demo/MainActivity.kt)的示例代码如下
```kotlin
val navController = rememberNavController()
val startDestination = remember { featureSDKs[0].featureKey() }
NavHost(navController = navController, startDestination = startDestination) {
featureSDKs.forEach { featureSdk ->
featureSdk.buildNavigationGraph(this, navController)
}
sharedNestedNavigationGraph(navController, featureSDKs)
}
```
这里使用了Compose提供的NavHost和NavHostController来管理整个App的导航图,并把第一个Feature SDK(例如Chat)作为导航图的路由起点。
为了避免Demo App和各个模块的耦合,每个模块都是通过Feature SDK的方式集成到Demo App,每个Feature SDK都实现buildNavigationGraph(...)接口来提供该模块的导航图。
[ChatFeatureSDK](chat-feature-sdk/src/main/java/com/example/chat/ChatFeatureSDK.kt)的示例代码如下:
```kotlin
override fun buildNavigationGraph(navGraphBuilder: NavGraphBuilder, navHostController: NavHostController) {
navGraphBuilder.chatNestedNavigationGraph(navHostController, featureKey())
}
```
每个Feature SDK用它全局唯一的Feature Key通过navigation(...)函数定义该模块导航图的路由入口,并指定该模块的起始页面(例如Screen.TopicList.route),每个可导航的页面则使用composable(...)函数来定义。
[NavigationGraph](chat-feature-sdk/src/main/java/com/example/chat/navigation/NavigationGraph.kt)的示例代码如下,这里通过给Compose的NavGraphBuilder提供了扩展函数chatNestedNavigationGraph(...)来定义模块的导航图。
```kotlin
fun NavGraphBuilder.chatNestedNavigationGraph(navHostController: NavHostController, featureKey: String) {
NavigationController.instance.navController = navHostController
navigation(startDestination = Screen.TopicList.route, route = featureKey) {
composable(Screen.TopicList.route) {
val viewModel: TopicListViewModel = hiltViewModel()
val uiConstraints = LayoutConstraints.init(LocalConfiguration.current)
TopicListScreen(viewModel.uiState, uiConstraints)
}
composable(Screen.TopicDetail.route,
arguments = listOf(navArgument("id"){ type = NavType.LongType})){
val viewModel: TopicDetailViewModel = hiltViewModel()
val uiConstraints = LayoutConstraints.init(LocalConfiguration.current)
TopicDetailScreen(viewModel.uiState, uiConstraints, viewModel.uiCommands)
}
composable(Screen.TopicSetting.route,
arguments = listOf(navArgument("id"){ type = NavType.LongType})){
val uiConstraints = LayoutConstraints.init(LocalConfiguration.current)
TopicSettingScreen(uiConstraints)
}
}
}
```
为了便于管理路由,这里定义了Screen类管理每个页面的路径。路径可以包含参数,由composable(...)函数的arguments参数指定。
[Screen](chat-feature-sdk/src/main/java/com/example/chat/navigation/Screen.kt)的示例代码如下
```kotlin
enum class Screen(val route: String) {
TopicList("chat/topic/list"),
TopicDetail("chat/topic/{id}/detail"),
TopicSetting("chat/topic/{id}/setting")
}
```
当用户在主题列表TopicListView(左图)里点击某个主题TopicEntryView后就会被导航到对应的主题聊天详情页面(右图)
[TopicListScreen](chat-feature-sdk/src/main/java/com/example/chat/view/TopicListScreen.kt)的示例代码如下
```kotlin
@Composable
fun TopicListView(topics: List, uiConstraints: LayoutConstraints, modifier:Modifier = Modifier.fillMaxSize()){
LazyColumn(modifier = modifier.background(DemoTheme.colors.secondary),
contentPadding = PaddingValues(horizontal = 0.dp,vertical = 8.dp),
verticalArrangement = Arrangement.spacedBy(8.dp)){
items(items = topics, key = {topic -> topic.id!!}){ topic ->
TopicEntryView(topic, uiConstraints){
NavigationController.instance.navigate(Screen.TopicDetail, topic.id.toString())
}
}
}
}
```
每个模块内部的导航这里使用了[NavigationController](chat-feature-sdk/src/main/java/com/example/chat/navigation/NavigationController.kt),
其内部使用了Compose提供的NavHostController来做模块内部的页面导航,navController?.navigate(...),代码如下:
```kotlin
fun navigate(screen: Screen, vararg params: String, builder: NavOptionsBuilder.() -> Unit = {launchSingleTop = true}) {
when(screen){
Screen.TopicDetail ->
navController?.navigate(screen.route.replace("{id}",params[0])){
builder()
}
Screen.TopicSetting ->
navController?.navigate(screen.route.replace("{id}",params[0]))
else ->
navController?.navigate(screen.route){
builder()
}
}
}
override fun navigate(route: String, vararg params: String, builder: NavOptionsBuilder.() -> Unit) {
Screen.values().lastOrNull { it.route == route }?.let {
navigate(it, *params){ builder() }
}
}
```
为了避免模块之间的耦合,模块于模块之间的导航借助NavigationMediator。
例如在Chat模块到聊天详情页面(左图)点击头像可以导航到Contact模块到Contact详情页面(右图),或者在Contact详情页面(右图)点击Message按钮进入到聊天详情页面(左图)。
使用NavigationMediator提供的navigate方法导航到另一个模块,尽可能地减少来模块之间的耦合,特别是模块间的循环依赖问题。
具体做法是当Feature SDK注册到NavigationMediator的时候,同时将它的所有导航路径和它的NavigationController都一并注册到NavigationMediator。
模块间的导航通过NavigationMediator查询目标路径是否存在,如果存在则调用对应的NavigationController导航到目标页面。
[NavigationMediator](app/src/main/java/com/example/demo/NavigationMediator.kt)的示例代码如下:
```kotlin
private val _routes = mutableMapOf()
override fun register(featureSDK: AbstractFeatureSDK) {
Log.i(TAG, "***register feature: key=${featureSDK.featureKey()}, class=${featureSDK.javaClass.canonicalName}")
_features.add(featureSDK)
val navigationController = featureSDK.getNavigationController()
navigationController.getNavigationRoutes().forEach {
_routes[it] = navigationController
Log.i(TAG,"***register route: $it")
}
}
override fun navigate(route: String, vararg params: String, builder: NavOptionsBuilder.() -> Unit) {
Log.i(TAG, "route=$route, hasRoute=${hasRoute(route)}")
if(hasRoute(route)){
_routes[route]?.navigate(route, *params){
builder()
}
}
}
```
#### 4.3 Compose Material Design
使用[Material Design](https://developer.android.google.cn/jetpack/compose/tutorial#lesson-3:-material-design) 管理界面风格,支持深色主题(夜间模式)。


 **自定义Theme**
创建[DemoTheme](core-feature-sdk/src/main/java/com/example/featuresdk/theme/Theme.kt),它使用了Compose的MaterialTheme,示例代码如下
```kotlin
@Composable
fun DemoTheme(
darkTheme: Boolean = isSystemInDarkTheme(),
content: @Composable() () -> Unit
) {
MaterialTheme(
colors = if (darkTheme) { DarkColorPalette } else { LightColorPalette },
content = content
)
}
```
这里使用Compose提供的isSystemInDarkTheme()函数来判断系统是否处于深色模式,并使用DemoTheme自定义的相应样式。
Theme主要由三大部分组成:
**1)Color颜色**
这些样式(DarkColorPalette或者LightColorPalette)都定义在 [Color](core-feature-sdk/src/main/java/com/example/featuresdk/theme/Color.kt),示例代码如下:
```kotlin
val DarkColorPalette = darkColors(
primary = Color.Black,
onPrimary = Color.White,
secondary = Color(0xFF1F1F1C),
onSecondary = Color.White
)
val LightColorPalette = lightColors(
primary = Color(0xE2ECECF0),
onPrimary = Color.Black,
secondary = Color.White,
onSecondary = Color.Black
)
```
Compose提供来默认的darkColors(...)和lightColors(...)来定义颜色,DemoApp通过它们来定制颜色样式。
**2)Typography排版**
排版样式在[Typography](core-feature-sdk/src/main/java/com/example/featuresdk/theme/Typography.kt)中根据需要定义自己的字体,包括名称,大小、颜色,风格等。
Compose的Typography提供了以下默认字体名称来设置字体样式,当然我们也自定义自己的字体名称。
```html
h1 - h1 is the largest headline, reserved for short, important text or numerals.
h2 - h2 is the second largest headline, reserved for short, important text or numerals.
h3 - h3 is the third largest headline, reserved for short, important text or numerals.
h4 - h4 is the fourth largest headline, reserved for short, important text or numerals.
h5 - h5 is the fifth largest headline, reserved for short, important text or numerals.
h6 - h6 is the sixth largest headline, reserved for short, important text or numerals.
subtitle1 - subtitle1 is the largest subtitle, and is typically reserved for medium-emphasis text that is shorter in length.
subtitle2 - subtitle2 is the smallest subtitle, and is typically reserved for medium-emphasis text that is shorter in length.
body1 - body1 is the largest body, and is typically used for long-form writing as it works well for small text sizes.
body2 - body2 is the smallest body, and is typically used for long-form writing as it works well for small text sizes.
button - button text is a call to action used in different types of buttons (such as text, outlined and contained buttons) and in tabs, dialogs, and cards.
caption - caption is one of the smallest font sizes. It is used sparingly to annotate imagery or to introduce a headline.
overline - overline is one of the smallest font sizes. It is used sparingly to annotate imagery or to introduce a headline.
```
例如这里创建一个名为header的字体专门用于Demo App的顶部导航栏的标题。
参考如下[Typography](core-feature-sdk/src/main/java/com/example/featuresdk/theme/Typography.kt)示例代码。
```kotlin
@Immutable
data class DemoTypography constructor(
val header : TextStyle = TextStyle(
fontFamily = FontFamily.Default,
fontWeight = FontWeight.Bold,
fontSize = 20.sp,
textAlign = TextAlign.Center
)
)
```
**3)Shape形状**
Compose默认提供了如下三种圆角形状:small,medium和large
```kotlin
package androidx.compose.material
@Immutable
class Shapes(
/**
* Shape used by small components like [Button] or [Snackbar]. Components like
* [FloatingActionButton], [ExtendedFloatingActionButton] use this shape, but override
* the corner size to be 50%. [TextField] uses this shape with overriding the bottom corners
* to zero.
*/
val small: CornerBasedShape = RoundedCornerShape(4.dp),
/**
* Shape used by medium components like [Card] or [AlertDialog].
*/
val medium: CornerBasedShape = RoundedCornerShape(4.dp),
/**
* Shape used by large components like [ModalDrawer] or [ModalBottomSheetLayout].
*/
val large: CornerBasedShape = RoundedCornerShape(0.dp)
)
```
我们可以创建自己的[Shape](core-feature-sdk/src/main/java/com/example/featuresdk/theme/Shape.kt)系统来扩展默认的Shapes
```kotlin
@Immutable
data class DemoShapes(
val small: Shape = DefaultShapes.small,
val medium: Shape = DefaultShapes.medium,
val large: Shape = DefaultShapes.large,
val xlarge: Shape = RoundedCornerShape(0.dp)
)
```
**DemoTheme的使用**
1)在[MainActivity](app/src/main/java/com/example/demo/MainActivity.kt)的setContent()中使用DemoTheme()函数将样式设置给所有Composable页面
```kotlin
setContent {
DemoTheme {
if (featureSDKs.isNotEmpty()) {
val navController = rememberNavController()
val startDestination = remember { featureSDKs[0].featureKey() }
NavHost(navController = navController, startDestination = startDestination) {
featureSDKs.forEach { featureSdk ->
featureSdk.buildNavigationGraph(this, navController)
}
sharedNestedNavigationGraph(navController, featureSDKs)
}
SearchScreen()
}
}
}
```
2)在[DemoTheme](core-feature-sdk/src/main/java/com/example/featuresdk/theme/Theme.kt)中创建DemoTheme(名字随意,建议跟跟Composable函数相同)对象,这样我们在页面中可以通过它来访问需要的具体样式条目,
```kotlin
object DemoTheme {
val colors: Colors
@Composable
get() = MaterialTheme.colors
val typography: DemoTypography
@Composable
get() = LocalDemoTypography.current
val shapes: DemoShapes
@Composable
get() = LocalDemoShapes.current
}
```
例如AppHeaderView通过DemoTheme.colors.primary可以获取primary颜色来设置顶部导航栏的背景色,示例代码如下background(DemoTheme.colors.primary)
```kotlin
@Composable
inline fun AppHeaderView(heightDp: Int, content: @Composable () -> Unit){
Row(modifier = Modifier
.background(DemoTheme.colors.primary)
.height(heightDp.dp)
.fillMaxWidth(), verticalAlignment = Alignment.CenterVertically) {
content()
}
}
```
组件的内容字体颜色通过相应的contentColorFor(...)函数来设置,通过style属性设置文字样式,示例代码如下:
```kotlin
@Composable
fun AppHeaderTitle(title:String = "", headerWidthDp:Int){
Text(text = title,
modifier = Modifier.width(headerWidthDp.dp),
style = DemoTheme.typography.header,
color = contentColorFor(DemoTheme.colors.primary))
}
```
### 5. Room: 本地数据库的持久化库
[Room](https://developer.android.google.cn/training/data-storage/room) 为SQLite提供了一个抽象层,以便在充分利用SQLite的强大功能的同时,能够流畅地访问数据库。
Room提供两种类型的数据库,内存型和文件型。
参考[AppRoomDatabaseFactory](app/src/main/java/com/example/demo/database/AppRoomDatabaseFactory.kt)示例代码
**内存型数据库**将数据保留在内存,App退出时数据将丢失。一般用于开发阶段,避免因频繁更改Entity而导致数据库迁移的问题。
```kotlin
Room.inMemoryDatabaseBuilder(context.applicationContext, AppRoomDatabase::class.java).build()
```
**文件型数据库**将数据保留在手机设备,App退出时数据不丢失。
```kotlin
Room.databaseBuilder(context.applicationContext, AppRoomDatabase::class.java,"demo_database.db").build()
```
这里[AppRoomDatabase](app/src/main/java/com/example/demo/database/AppRoomDatabase.kt)指定了数据库的实体类(Entity class,对应于数据库中的表table)和DAO(Data Access Object),
实体类和DAO都是由每个模块提供,统一在AppRoomDatabase里注册,示例代码如下。
```kotlin
@Database(entities = [com.example.chat.model.Message::class
,com.example.chat.model.Topic::class
], version = 1, exportSchema = false)
abstract class AppRoomDatabase: RoomDatabase() {
abstract fun messageDao(): com.example.chat.repository.MessageDao
abstract fun topicDao(): com.example.chat.repository.TopicDao
//codes omitted
}
```
每个实体类使用@Entity标签来声明,例如Chat模块的[Message](chat-feature-sdk/src/main/java/com/example/chat/model/Message.kt)实体类
```kotlin
@Entity(tableName = "message")
data class Message (
@PrimaryKey (autoGenerate = true) val id: Long? = null,
@ColumnInfo(name = "topic_id") val topicId: Long,
val sender: Long,
val text: String? = null,
val image: Int? = null,
val status: MessageStatus = MessageStatus.New,
@ColumnInfo(name="create_timestamp") val timestamp: Timestamp = Timestamp(System.currentTimeMillis())
)
```
每个DAO类使用@Dao标签来声明,例如Chat模块的[MessageDao](chat-feature-sdk/src/main/java/com/example/chat/repository/MessageDao.kt)
```kotlin
@Dao
interface MessageDao : BasicDao {
/**
* get all messages for a topic
*/
@Query("select * from message where topic_id = :topicId order by id asc")
fun get(topicId: Long): Flow>
}
```
### 6. Hilt: 建立在Dagger之上的依赖注入库 (没有"刀柄"的"匕首"不好用^_^)
Hilt 是 Android 的依赖项注入库,可减少在项目中执行手动依赖项注入的样板代码。
Hilt 通过为项目中的每个 Android 类提供容器并自动管理其生命周期,提供了一种在应用中使用 DI(依赖项注入)的标准方法。
Hilt 在依赖项注入库 Dagger 的基础上构建而成,提供了一种将 Dagger 纳入 Android 应用的标准方法。
1)简化 Android 应用的 Dagger 相关基础架构。
2)创建一组标准的组件和作用域,以简化设置、提高可读性以及在应用之间共享代码。
3)提供一种简单的方法来为各种构建类型(如测试、调试或发布)配置不同的绑定。
关于Hilt的使用,请参考官方介绍[使用 Hilt 实现依赖项注入](https://developer.android.google.cn/training/dependency-injection/hilt-android)
在Compose Navigation使用Hilt时,需要使用[hilt-navigation-compose](https://developer.android.google.cn/jetpack/androidx/releases/hilt) 的hiltViewModel()函数来获取ViewModel实例。
如果使用[lifecycle-viewmodel-compose](https://developer.android.google.cn/jetpack/androidx/releases/lifecycle) 的viewModel()函数,则无法给ViewModel实例注入依赖。
在项目中声明hilt-navigation-compose的依赖
```kotlin
implementation "androidx.hilt:hilt-navigation-compose:$hilt_nav_compose_version"
```
在ViewModel中声明依赖项,例如ExampleViewModel依赖于dependency1和dependency2
```kotlin
@HiltViewModel
class ExampleViewModel
@Inject constructor(private val dependency1: Dependency1,
private val dependency2: Dependency2): ViewModel() {
//code omitted
}
```
在compose navigation里使用hiltViewModel()来获取ExampleViewModel的实例。
```kotlin
val navController = rememberNavController()
NavHost(navController, startDestination = "ExampleRoute") {
composable("ExampleRoute") {
val viewModel = hiltViewModel()
}
}
```
### 7. Accessibility 无障碍服务
参考[Accessibility in Compose](https://developer.android.google.cn/jetpack/compose/accessibility)
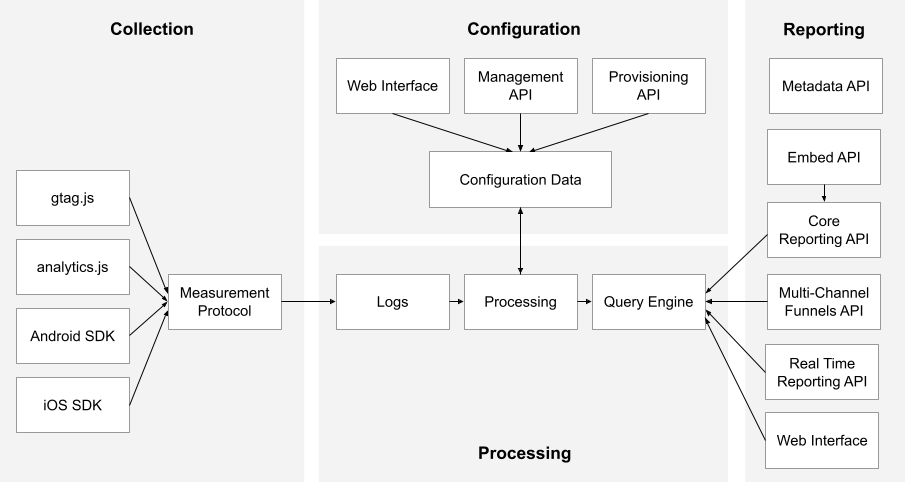
### 8. Analytics tracking (分析跟踪用户行为)
分析跟踪用户行为,例如用户浏览了哪些页面(数据),点击了哪些按钮(执行了哪些操作)等等,有助于优化App的用户体验,也有利于市场营销(精准推送用户最感兴趣的产品)。
比较出名的解决方案有[Tealium](https://tealium.com/docs-overview/) 和 [Google Analytics](https://developers.google.cn/analytics/devguides/platform)
它们都提供了Web/Android/iOS这些平台对应的集成方案。每个项目使用的解决方案不尽相同,即使同一项目在不同的时期也可能使用不同的解决方案。
下面是来自Google Analytics的一个逻辑架构,概要说明了“数据收集“,”处理分析”和“汇总报告”的整个流程
**自定义Theme**
创建[DemoTheme](core-feature-sdk/src/main/java/com/example/featuresdk/theme/Theme.kt),它使用了Compose的MaterialTheme,示例代码如下
```kotlin
@Composable
fun DemoTheme(
darkTheme: Boolean = isSystemInDarkTheme(),
content: @Composable() () -> Unit
) {
MaterialTheme(
colors = if (darkTheme) { DarkColorPalette } else { LightColorPalette },
content = content
)
}
```
这里使用Compose提供的isSystemInDarkTheme()函数来判断系统是否处于深色模式,并使用DemoTheme自定义的相应样式。
Theme主要由三大部分组成:
**1)Color颜色**
这些样式(DarkColorPalette或者LightColorPalette)都定义在 [Color](core-feature-sdk/src/main/java/com/example/featuresdk/theme/Color.kt),示例代码如下:
```kotlin
val DarkColorPalette = darkColors(
primary = Color.Black,
onPrimary = Color.White,
secondary = Color(0xFF1F1F1C),
onSecondary = Color.White
)
val LightColorPalette = lightColors(
primary = Color(0xE2ECECF0),
onPrimary = Color.Black,
secondary = Color.White,
onSecondary = Color.Black
)
```
Compose提供来默认的darkColors(...)和lightColors(...)来定义颜色,DemoApp通过它们来定制颜色样式。
**2)Typography排版**
排版样式在[Typography](core-feature-sdk/src/main/java/com/example/featuresdk/theme/Typography.kt)中根据需要定义自己的字体,包括名称,大小、颜色,风格等。
Compose的Typography提供了以下默认字体名称来设置字体样式,当然我们也自定义自己的字体名称。
```html
h1 - h1 is the largest headline, reserved for short, important text or numerals.
h2 - h2 is the second largest headline, reserved for short, important text or numerals.
h3 - h3 is the third largest headline, reserved for short, important text or numerals.
h4 - h4 is the fourth largest headline, reserved for short, important text or numerals.
h5 - h5 is the fifth largest headline, reserved for short, important text or numerals.
h6 - h6 is the sixth largest headline, reserved for short, important text or numerals.
subtitle1 - subtitle1 is the largest subtitle, and is typically reserved for medium-emphasis text that is shorter in length.
subtitle2 - subtitle2 is the smallest subtitle, and is typically reserved for medium-emphasis text that is shorter in length.
body1 - body1 is the largest body, and is typically used for long-form writing as it works well for small text sizes.
body2 - body2 is the smallest body, and is typically used for long-form writing as it works well for small text sizes.
button - button text is a call to action used in different types of buttons (such as text, outlined and contained buttons) and in tabs, dialogs, and cards.
caption - caption is one of the smallest font sizes. It is used sparingly to annotate imagery or to introduce a headline.
overline - overline is one of the smallest font sizes. It is used sparingly to annotate imagery or to introduce a headline.
```
例如这里创建一个名为header的字体专门用于Demo App的顶部导航栏的标题。
参考如下[Typography](core-feature-sdk/src/main/java/com/example/featuresdk/theme/Typography.kt)示例代码。
```kotlin
@Immutable
data class DemoTypography constructor(
val header : TextStyle = TextStyle(
fontFamily = FontFamily.Default,
fontWeight = FontWeight.Bold,
fontSize = 20.sp,
textAlign = TextAlign.Center
)
)
```
**3)Shape形状**
Compose默认提供了如下三种圆角形状:small,medium和large
```kotlin
package androidx.compose.material
@Immutable
class Shapes(
/**
* Shape used by small components like [Button] or [Snackbar]. Components like
* [FloatingActionButton], [ExtendedFloatingActionButton] use this shape, but override
* the corner size to be 50%. [TextField] uses this shape with overriding the bottom corners
* to zero.
*/
val small: CornerBasedShape = RoundedCornerShape(4.dp),
/**
* Shape used by medium components like [Card] or [AlertDialog].
*/
val medium: CornerBasedShape = RoundedCornerShape(4.dp),
/**
* Shape used by large components like [ModalDrawer] or [ModalBottomSheetLayout].
*/
val large: CornerBasedShape = RoundedCornerShape(0.dp)
)
```
我们可以创建自己的[Shape](core-feature-sdk/src/main/java/com/example/featuresdk/theme/Shape.kt)系统来扩展默认的Shapes
```kotlin
@Immutable
data class DemoShapes(
val small: Shape = DefaultShapes.small,
val medium: Shape = DefaultShapes.medium,
val large: Shape = DefaultShapes.large,
val xlarge: Shape = RoundedCornerShape(0.dp)
)
```
**DemoTheme的使用**
1)在[MainActivity](app/src/main/java/com/example/demo/MainActivity.kt)的setContent()中使用DemoTheme()函数将样式设置给所有Composable页面
```kotlin
setContent {
DemoTheme {
if (featureSDKs.isNotEmpty()) {
val navController = rememberNavController()
val startDestination = remember { featureSDKs[0].featureKey() }
NavHost(navController = navController, startDestination = startDestination) {
featureSDKs.forEach { featureSdk ->
featureSdk.buildNavigationGraph(this, navController)
}
sharedNestedNavigationGraph(navController, featureSDKs)
}
SearchScreen()
}
}
}
```
2)在[DemoTheme](core-feature-sdk/src/main/java/com/example/featuresdk/theme/Theme.kt)中创建DemoTheme(名字随意,建议跟跟Composable函数相同)对象,这样我们在页面中可以通过它来访问需要的具体样式条目,
```kotlin
object DemoTheme {
val colors: Colors
@Composable
get() = MaterialTheme.colors
val typography: DemoTypography
@Composable
get() = LocalDemoTypography.current
val shapes: DemoShapes
@Composable
get() = LocalDemoShapes.current
}
```
例如AppHeaderView通过DemoTheme.colors.primary可以获取primary颜色来设置顶部导航栏的背景色,示例代码如下background(DemoTheme.colors.primary)
```kotlin
@Composable
inline fun AppHeaderView(heightDp: Int, content: @Composable () -> Unit){
Row(modifier = Modifier
.background(DemoTheme.colors.primary)
.height(heightDp.dp)
.fillMaxWidth(), verticalAlignment = Alignment.CenterVertically) {
content()
}
}
```
组件的内容字体颜色通过相应的contentColorFor(...)函数来设置,通过style属性设置文字样式,示例代码如下:
```kotlin
@Composable
fun AppHeaderTitle(title:String = "", headerWidthDp:Int){
Text(text = title,
modifier = Modifier.width(headerWidthDp.dp),
style = DemoTheme.typography.header,
color = contentColorFor(DemoTheme.colors.primary))
}
```
### 5. Room: 本地数据库的持久化库
[Room](https://developer.android.google.cn/training/data-storage/room) 为SQLite提供了一个抽象层,以便在充分利用SQLite的强大功能的同时,能够流畅地访问数据库。
Room提供两种类型的数据库,内存型和文件型。
参考[AppRoomDatabaseFactory](app/src/main/java/com/example/demo/database/AppRoomDatabaseFactory.kt)示例代码
**内存型数据库**将数据保留在内存,App退出时数据将丢失。一般用于开发阶段,避免因频繁更改Entity而导致数据库迁移的问题。
```kotlin
Room.inMemoryDatabaseBuilder(context.applicationContext, AppRoomDatabase::class.java).build()
```
**文件型数据库**将数据保留在手机设备,App退出时数据不丢失。
```kotlin
Room.databaseBuilder(context.applicationContext, AppRoomDatabase::class.java,"demo_database.db").build()
```
这里[AppRoomDatabase](app/src/main/java/com/example/demo/database/AppRoomDatabase.kt)指定了数据库的实体类(Entity class,对应于数据库中的表table)和DAO(Data Access Object),
实体类和DAO都是由每个模块提供,统一在AppRoomDatabase里注册,示例代码如下。
```kotlin
@Database(entities = [com.example.chat.model.Message::class
,com.example.chat.model.Topic::class
], version = 1, exportSchema = false)
abstract class AppRoomDatabase: RoomDatabase() {
abstract fun messageDao(): com.example.chat.repository.MessageDao
abstract fun topicDao(): com.example.chat.repository.TopicDao
//codes omitted
}
```
每个实体类使用@Entity标签来声明,例如Chat模块的[Message](chat-feature-sdk/src/main/java/com/example/chat/model/Message.kt)实体类
```kotlin
@Entity(tableName = "message")
data class Message (
@PrimaryKey (autoGenerate = true) val id: Long? = null,
@ColumnInfo(name = "topic_id") val topicId: Long,
val sender: Long,
val text: String? = null,
val image: Int? = null,
val status: MessageStatus = MessageStatus.New,
@ColumnInfo(name="create_timestamp") val timestamp: Timestamp = Timestamp(System.currentTimeMillis())
)
```
每个DAO类使用@Dao标签来声明,例如Chat模块的[MessageDao](chat-feature-sdk/src/main/java/com/example/chat/repository/MessageDao.kt)
```kotlin
@Dao
interface MessageDao : BasicDao {
/**
* get all messages for a topic
*/
@Query("select * from message where topic_id = :topicId order by id asc")
fun get(topicId: Long): Flow>
}
```
### 6. Hilt: 建立在Dagger之上的依赖注入库 (没有"刀柄"的"匕首"不好用^_^)
Hilt 是 Android 的依赖项注入库,可减少在项目中执行手动依赖项注入的样板代码。
Hilt 通过为项目中的每个 Android 类提供容器并自动管理其生命周期,提供了一种在应用中使用 DI(依赖项注入)的标准方法。
Hilt 在依赖项注入库 Dagger 的基础上构建而成,提供了一种将 Dagger 纳入 Android 应用的标准方法。
1)简化 Android 应用的 Dagger 相关基础架构。
2)创建一组标准的组件和作用域,以简化设置、提高可读性以及在应用之间共享代码。
3)提供一种简单的方法来为各种构建类型(如测试、调试或发布)配置不同的绑定。
关于Hilt的使用,请参考官方介绍[使用 Hilt 实现依赖项注入](https://developer.android.google.cn/training/dependency-injection/hilt-android)
在Compose Navigation使用Hilt时,需要使用[hilt-navigation-compose](https://developer.android.google.cn/jetpack/androidx/releases/hilt) 的hiltViewModel()函数来获取ViewModel实例。
如果使用[lifecycle-viewmodel-compose](https://developer.android.google.cn/jetpack/androidx/releases/lifecycle) 的viewModel()函数,则无法给ViewModel实例注入依赖。
在项目中声明hilt-navigation-compose的依赖
```kotlin
implementation "androidx.hilt:hilt-navigation-compose:$hilt_nav_compose_version"
```
在ViewModel中声明依赖项,例如ExampleViewModel依赖于dependency1和dependency2
```kotlin
@HiltViewModel
class ExampleViewModel
@Inject constructor(private val dependency1: Dependency1,
private val dependency2: Dependency2): ViewModel() {
//code omitted
}
```
在compose navigation里使用hiltViewModel()来获取ExampleViewModel的实例。
```kotlin
val navController = rememberNavController()
NavHost(navController, startDestination = "ExampleRoute") {
composable("ExampleRoute") {
val viewModel = hiltViewModel()
}
}
```
### 7. Accessibility 无障碍服务
参考[Accessibility in Compose](https://developer.android.google.cn/jetpack/compose/accessibility)
### 8. Analytics tracking (分析跟踪用户行为)
分析跟踪用户行为,例如用户浏览了哪些页面(数据),点击了哪些按钮(执行了哪些操作)等等,有助于优化App的用户体验,也有利于市场营销(精准推送用户最感兴趣的产品)。
比较出名的解决方案有[Tealium](https://tealium.com/docs-overview/) 和 [Google Analytics](https://developers.google.cn/analytics/devguides/platform)
它们都提供了Web/Android/iOS这些平台对应的集成方案。每个项目使用的解决方案不尽相同,即使同一项目在不同的时期也可能使用不同的解决方案。
下面是来自Google Analytics的一个逻辑架构,概要说明了“数据收集“,”处理分析”和“汇总报告”的整个流程
 为了避免不同的解决方案对项目造成侵入性的影响,一般需要在项目中定义一个集成层来屏蔽不同解决方案的差异,
这里我们定义了 一个`IAnalyticsDelegate`接口(简单起见,接口只定义一个参数)
```kotlin
interface IAnalyticsDelegate {
/**
* Track page event e.g. page is loaded when user enters it or page is destroyed when user leaves it
*/
fun trackPage(pageName: String)
/**
* Track action event e.g. user clicks a button to submit an order
*/
fun trackAction(actionName: String)
}
```
IAnalyticsDelegate的实现类AnalyticsDelegate则负责将App的数据传给相应解决方案提供的SDK。
对于使用了Compose的页面,需要利用Compose的DisposableEffect[附带效应Side Effects](https://developer.android.google.cn/jetpack/compose/side-effects)
来专门处理页面的生命周期事件。为此,这里创建[ScreenAnalytics](core-feature-sdk/src/main/java/com/example/featuresdk/analytics/ScreenAnalytics.kt)
组合函数来处理Compose页面的加载事件,当用户访问某个Compose页面时,通过监听它的LifecycleOwner的生命周期事件如Lifecycle.Event.ON_START来发送页面信息给后台。
例如这里使用ScreenAnalytics组合函数来收集用户打开聊天详情页面的事件,示例代码如下
```kotlin
ScreenAnalytics(screenName = "TopicDetailScreen") {
TopicDetailScreen(viewModel.uiState, uiConstraints, viewModel.uiCommands)
}
```
[ScreenAnalytics](core-feature-sdk/src/main/java/com/example/featuresdk/analytics/ScreenAnalytics.kt)的示例代码如下
```kotlin
@Composable
fun ScreenAnalytics(lifecycleOwner: LifecycleOwner = LocalLifecycleOwner.current,
onStart: (name: String) -> Unit = { name -> AnalyticsDelegate.instance.trackPage(name) }, // Send the 'started' analytics event
screenName:String = "Unknown",
screenContent: @Composable ()-> Unit){
// Safely update the current lambdas when a new one is provided
val currentOnStart by rememberUpdatedState(onStart)
// If `lifecycleOwner` changes, dispose and reset the effect
DisposableEffect(lifecycleOwner) {
// Create an observer that triggers our remembered callbacks for sending analytics events
val observer = LifecycleEventObserver { _, event ->
when(event){
Lifecycle.Event.ON_START -> currentOnStart(screenName)
else -> {
//Log.i("ScreenLoadAnalytics", "event=${event.name} screenName=$screenName lifecycleOwner=$source")
}
}
}
// Add the observer to the lifecycle
lifecycleOwner.lifecycle.addObserver(observer)
// When the effect leaves the Composition, remove the observer
onDispose {
//Log.e("ScreenLoadAnalytics","onDispose: lifecycleOwner=$lifecycleOwner screenName=$screenName")
lifecycleOwner.lifecycle.removeObserver(observer)
}
}
screenContent()
}
```
为了避免不同的解决方案对项目造成侵入性的影响,一般需要在项目中定义一个集成层来屏蔽不同解决方案的差异,
这里我们定义了 一个`IAnalyticsDelegate`接口(简单起见,接口只定义一个参数)
```kotlin
interface IAnalyticsDelegate {
/**
* Track page event e.g. page is loaded when user enters it or page is destroyed when user leaves it
*/
fun trackPage(pageName: String)
/**
* Track action event e.g. user clicks a button to submit an order
*/
fun trackAction(actionName: String)
}
```
IAnalyticsDelegate的实现类AnalyticsDelegate则负责将App的数据传给相应解决方案提供的SDK。
对于使用了Compose的页面,需要利用Compose的DisposableEffect[附带效应Side Effects](https://developer.android.google.cn/jetpack/compose/side-effects)
来专门处理页面的生命周期事件。为此,这里创建[ScreenAnalytics](core-feature-sdk/src/main/java/com/example/featuresdk/analytics/ScreenAnalytics.kt)
组合函数来处理Compose页面的加载事件,当用户访问某个Compose页面时,通过监听它的LifecycleOwner的生命周期事件如Lifecycle.Event.ON_START来发送页面信息给后台。
例如这里使用ScreenAnalytics组合函数来收集用户打开聊天详情页面的事件,示例代码如下
```kotlin
ScreenAnalytics(screenName = "TopicDetailScreen") {
TopicDetailScreen(viewModel.uiState, uiConstraints, viewModel.uiCommands)
}
```
[ScreenAnalytics](core-feature-sdk/src/main/java/com/example/featuresdk/analytics/ScreenAnalytics.kt)的示例代码如下
```kotlin
@Composable
fun ScreenAnalytics(lifecycleOwner: LifecycleOwner = LocalLifecycleOwner.current,
onStart: (name: String) -> Unit = { name -> AnalyticsDelegate.instance.trackPage(name) }, // Send the 'started' analytics event
screenName:String = "Unknown",
screenContent: @Composable ()-> Unit){
// Safely update the current lambdas when a new one is provided
val currentOnStart by rememberUpdatedState(onStart)
// If `lifecycleOwner` changes, dispose and reset the effect
DisposableEffect(lifecycleOwner) {
// Create an observer that triggers our remembered callbacks for sending analytics events
val observer = LifecycleEventObserver { _, event ->
when(event){
Lifecycle.Event.ON_START -> currentOnStart(screenName)
else -> {
//Log.i("ScreenLoadAnalytics", "event=${event.name} screenName=$screenName lifecycleOwner=$source")
}
}
}
// Add the observer to the lifecycle
lifecycleOwner.lifecycle.addObserver(observer)
// When the effect leaves the Composition, remove the observer
onDispose {
//Log.e("ScreenLoadAnalytics","onDispose: lifecycleOwner=$lifecycleOwner screenName=$screenName")
lifecycleOwner.lifecycle.removeObserver(observer)
}
}
screenContent()
}
```