# age-viewer
**Repository Path**: beyond-prototype/age-viewer
## Basic Information
- **Project Name**: age-viewer
- **Description**: Graph database optimized for fast analysis and real-time data processing. It is provided as an extension to PostgreSQL.
- **Primary Language**: Unknown
- **License**: Apache-2.0
- **Default Branch**: main
- **Homepage**: None
- **GVP Project**: No
## Statistics
- **Stars**: 0
- **Forks**: 1
- **Created**: 2026-02-13
- **Last Updated**: 2026-02-13
## Categories & Tags
**Categories**: Uncategorized
**Tags**: None
## README
[](http://makeapullrequest.com)

 # What is Apache-Age Viewer
Apache-Age Viewer is a web based user interface that provides visualization of graph data stored in a postgreSQL database with AGE extension.
It is graph visualisation tool, for Apache AGE.
This is a sub-project of [the Apache AGE project](https://age.apache.org/#).
# Recommend Node Version & install module
- Node version - ^14.16.0
- Node Module - pm2
Install latest **pm2** with :
``` npm i pm2 ```
> [pm2](https://www.npmjs.com/package/pm2) is an NPM module to run the project in production mode, and hence is optional for getting started with setting up development environment for Age-Viewer
# Running Age-Viewer
- Install the required node modules using :
```npm run setup```
- Run Age-Viewer using :
```npm run start```
>This will start the age-viewer on http://localhost:3000 if port 3000 is free.
# How to build using command
- Build the front-end :
```npm run build-front ```
- Build the back-end :
``` npm run build-back```
- Start the project in production mode :
```
pm2 stop ag-viewer-develop
pm2 delete ag-viewer-develop
pm2 start ecosystem.config.js
```
# How to start using Age-Viewer
- To start using Age-Viewer we need to have a running postgreSQL database server with Apache Age Extension
### Setting up the PostgreSQL server with AGE extension
- Easiest way for Windows, Mac-OS and Linux Environment using **Docker**
> Install docker in advance (https://www.docker.com/get-started), install the version compatible with your OS from the provided link.
**Run Using Docker** :
- Get the docker image -
```docker pull apache/age ```
- Create AGE docker container
```bash
docker run --name myPostgresDb -p 5455:5432 -e POSTGRES_USER=postgresUser \
-e POSTGRES_PASSWORD=postgresPW -e POSTGRES_DB=postgresDB -d apache/age
```
| Docker variables| Description |
|--|--|
| ``--name`` | Assign a name to the container |
| `-p` | Publish a container’s port(s) to the host|
| ``-e``| Set environment variables|
| ``-d``| Run container in background and print container ID|
- To Get the running log of the docker container created -
`` docker logs --follow myPostgresDb``
- To Get into postgreSQL Shell (There are two ways this can be done) -
- First get into docker shell using - `` docker exec -it myPostgresDb bash``
# What is Apache-Age Viewer
Apache-Age Viewer is a web based user interface that provides visualization of graph data stored in a postgreSQL database with AGE extension.
It is graph visualisation tool, for Apache AGE.
This is a sub-project of [the Apache AGE project](https://age.apache.org/#).
# Recommend Node Version & install module
- Node version - ^14.16.0
- Node Module - pm2
Install latest **pm2** with :
``` npm i pm2 ```
> [pm2](https://www.npmjs.com/package/pm2) is an NPM module to run the project in production mode, and hence is optional for getting started with setting up development environment for Age-Viewer
# Running Age-Viewer
- Install the required node modules using :
```npm run setup```
- Run Age-Viewer using :
```npm run start```
>This will start the age-viewer on http://localhost:3000 if port 3000 is free.
# How to build using command
- Build the front-end :
```npm run build-front ```
- Build the back-end :
``` npm run build-back```
- Start the project in production mode :
```
pm2 stop ag-viewer-develop
pm2 delete ag-viewer-develop
pm2 start ecosystem.config.js
```
# How to start using Age-Viewer
- To start using Age-Viewer we need to have a running postgreSQL database server with Apache Age Extension
### Setting up the PostgreSQL server with AGE extension
- Easiest way for Windows, Mac-OS and Linux Environment using **Docker**
> Install docker in advance (https://www.docker.com/get-started), install the version compatible with your OS from the provided link.
**Run Using Docker** :
- Get the docker image -
```docker pull apache/age ```
- Create AGE docker container
```bash
docker run --name myPostgresDb -p 5455:5432 -e POSTGRES_USER=postgresUser \
-e POSTGRES_PASSWORD=postgresPW -e POSTGRES_DB=postgresDB -d apache/age
```
| Docker variables| Description |
|--|--|
| ``--name`` | Assign a name to the container |
| `-p` | Publish a container’s port(s) to the host|
| ``-e``| Set environment variables|
| ``-d``| Run container in background and print container ID|
- To Get the running log of the docker container created -
`` docker logs --follow myPostgresDb``
- To Get into postgreSQL Shell (There are two ways this can be done) -
- First get into docker shell using - `` docker exec -it myPostgresDb bash``
Then get into postgreSQL shell using - `` psql -U postgresUser postgresDB``
OR
- Alternatively postgres shell can also be assessed directly (without getting into the docker shell) -
`` psql -U postgresUser -d postgresDB -p 5455 -h localhost``
and put in ``postgresPW`` when prompted for password.
- After logging into postgreSQL shell follow the [Post-Installation](https://github.com/apache/age#post-installation) instruction to create a graph in the database.
### Connect Apache Age-Viewer to PostgreSQL Database
**Initial Connection Layout**
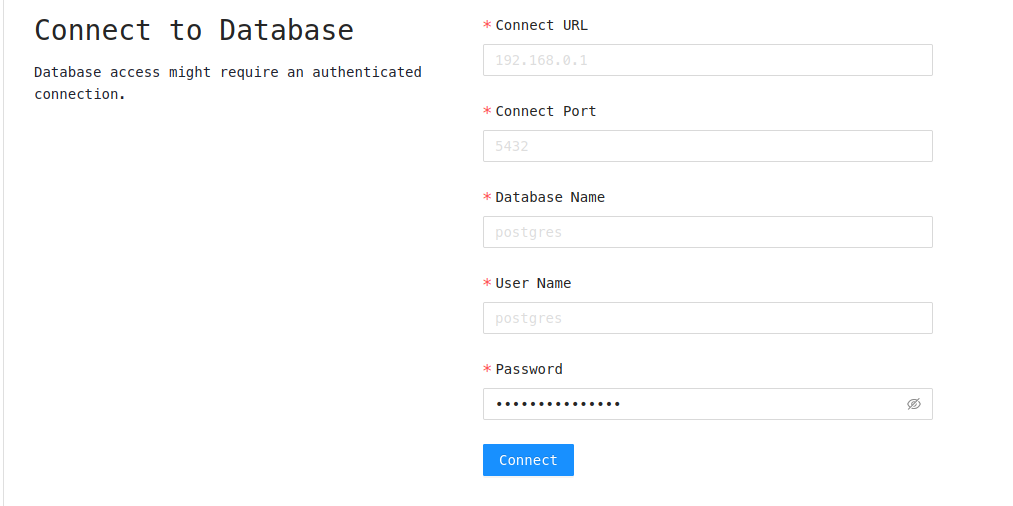
To Connect to postgreSQL server running from Docker Container
- Connect URL - localhost
- Connect Port - 5455
- Database Name - postgresDB
- User Name - postgresUser
- Password - postgresPW
> The following field is same as used to make the docker container specified above as flags.
# License
Apache AGE Viewer is licensed under the Apache License, Version 2.0. See LICENSE for the full license text.